Headless proxy quickstart guide
The underlying proxy/middleware technology that powers the Surfly co-browsing could be used for many other purposes. Some time ago we announced Surfly Interaction Middleware and later shared some details of how it works. Right now we are working together with a few early adopters to find the best way to provide the sandboxing proxy to the general public.
If you want to get early access to the “headless” proxy described in this guide, please contact us.
This article with help you get started with the experimental “headless” sessions. It gives an overview of how things work, and how you can start using it.
Headless sessions are stripped-down sessions. Unlike co-browsing sessions, they don't implement any leader-follower synchronisation, and they don't add any custom UI such as virtual tabs and videochat. What they offer is a HTTP/WS proxy and the sophisticated JS/DOM sandbox. This makes it a perfect tool for building “middleware” apps. As a developer, you'll have the ability to adjust your users' view of the web, adding or removing functionality from pages to give a different browsing experience than if they had visited the site outside of Surfly. You can think of it as a browser extension that doesn't require any installation on the client side.
Real-life showcase: WebToppings
To get a taste of what you can do with this technology, check WebToppings.bar. It is a free service that is using Surfly headless proxy to enhance browsing experience. All “toppings” are using the approach described below. During hackprinceton, you will be able to create your own “topping” in minutes.
API access
To use the API, you will need a REST API key with an unlocked headless feature. Since this functionality is in early access, it's disabled by default. But we will be happy to give you access, just reach out to us.
Demo app
I you want to jump straight to the code, we have prepared a minimal working example which demonstrates how to use the headless proxy. It is a small app that can replace all images on the proxied page with a Doot-Doot. The source code is heavily commented. Feel free to remix it on Glitch: https://glitch.com/edit/#!/headless-tiger
Overview of the Surfly proxy
The Surfly “headless” proxy is a general-purpose tool, so there are a few different ways that you could get a user into a session.
Here's one way you could use it:
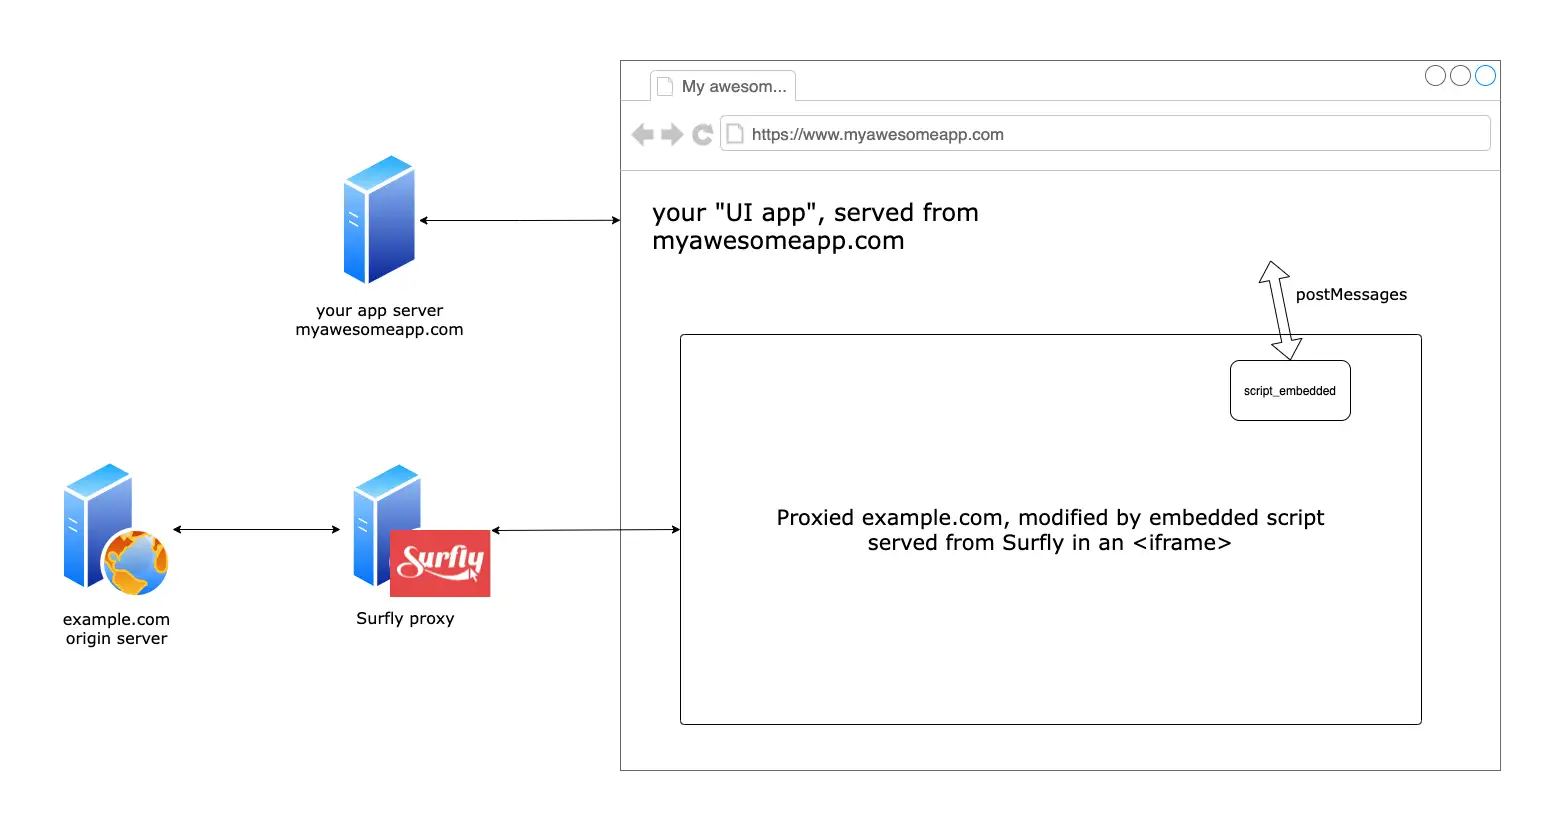
- A user navigates to your site (let's call it “UI app”). UI app is a normal web application that you build using whatever tools you like
- UI app calls Surfly REST API to create a Surfly headless session
- Surfly sessions have multiple options that change their behaviour. For the headless proxy, the most important are headless (should be set to true), and script_embedded (more on it below)
- Session creation request also includes a url parameter, which determines the initial page where the session would start
- UI app displays an iframe that loads the URL received in the API response
- The user continues browsing from that iframe
- UI app can also issue commands to the iframe, in case you want to add browser-like buttons to the UI app that cause the inner iframe to navigate or otherwise control the proxy session
There are fundamentally two pieces that you'll be developing:
- The embedded script: the custom JS that will run in the context of the proxied page (similar to a content script in a browser extension)
- The UI app: the page that starts a proxy session, embeds it in an iframe and (optionally) controls it once it's created
The embedded script��
The custom JS that controls all proxied pages is the embedded script. This script can modify pages as they load, similar to content scripts in a browser extension. To use the embedded script, you provide its URL in the script_embedded option when creating a session.
The embedded script will be injected in every proxied page with a <script>
tag. Since it has full control over the proxied webpage, it can change it in any
way you want: add/remove elements, CSS styles, make fetch requests, and
communicate with the parent UI frame using postMessage.
The UI app
The page that prepares the session is called the UI app. All the setup happens here, as does any eventual interaction with the session once it's loaded. This is the place to put anything that should not change when a user navigates to a different page inside the iframe serving the Surfly session. The UI frame is your browser-within-a-browser, and you'll just use usual web tech to build it.
The UI app is a normal web application that contains the business logic of your application. It is using Surfly proxy to embed proxied versions of (3rd-party) web pages, and it can control those pages via the embedded script. The embedded script can communicate with the parent UI frame using postMessages.
How it works under the hood
The coolest thing about Surfly sessions is that it is a sandboxing proxy. This means that it doesn't just proxy the HTTP and WS traffic, it also changes the content. For example, when proxying Wikipedia, you will not see wikipedia.org inside your browser address bar. Instead, you will see an encoded domain that points to Surfly. It also modifies the JS context on the client side, so it can wrap dynamic content as well.
Technically, a proxied website is a different web application, so it does not share context (e.g. cookies) with the original, unproxied application. HTML and JS code is transformed on the fly, ensuring that all the links and subsequent requests point to the proxied domain. If you are interested in how it works, see our blog posts (1, 2).