Session Continuation
Who is this guide for?
The following guide is intended for readers that are familiar with the following concepts:
What is session-continuation
Browsers have many ways to store state information for a website. Setting cookies is one of them.
You might already know that our JS API (Surfly's Widget) allows you start a Surfly session transferring most of the website's state information like sessionStorage, localStorage, non-httpOnly cookies, and form fields.
But sometimes that's not enough and you might need to transfer httpOnly
cookies. That's when Session continuation comes in.
Session continuation is a mechanism that allows you to start a Surfly
session on a website while preserving httpOnly cookies.
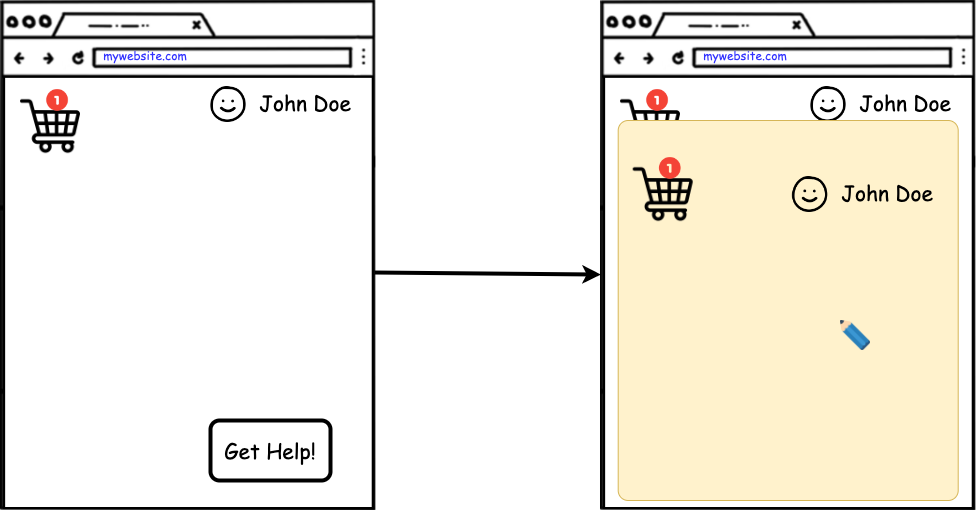
A user is browsing through a shopping website. While they navigate the user struggles filling in the payment form, and they seek help from a support agent. The agent starts a Surfly session which opens in an iframe on top of the original website. The user doesn't see much of a difference, except for the second cursor on the screen that belongs to the agent.
In this example, all cookies are transferred inside the Surfly session so the user preserves the login and shopping cart information.
Do I need session continuation?
The first thing you have to determine is if you need session continuation at all.
As previously explained, browsers store website state in different ways. So if
you find yourself in the need to start a Surfly session while preserving the
state that is stored in session cookies (httpOnly cookies), then you probably
need this feature.
One of the most common use cases for this feature is when you need to start a Surfly session on a website that requires login and you want to spare the user from having to login again inside the session.
How does it work?
Session Continuation is intended to solve the problem of transferring cookies
that we cannot read using native JavaScript APIs (httpOnly cookies) by
leveraing the concept of same-site
requests.
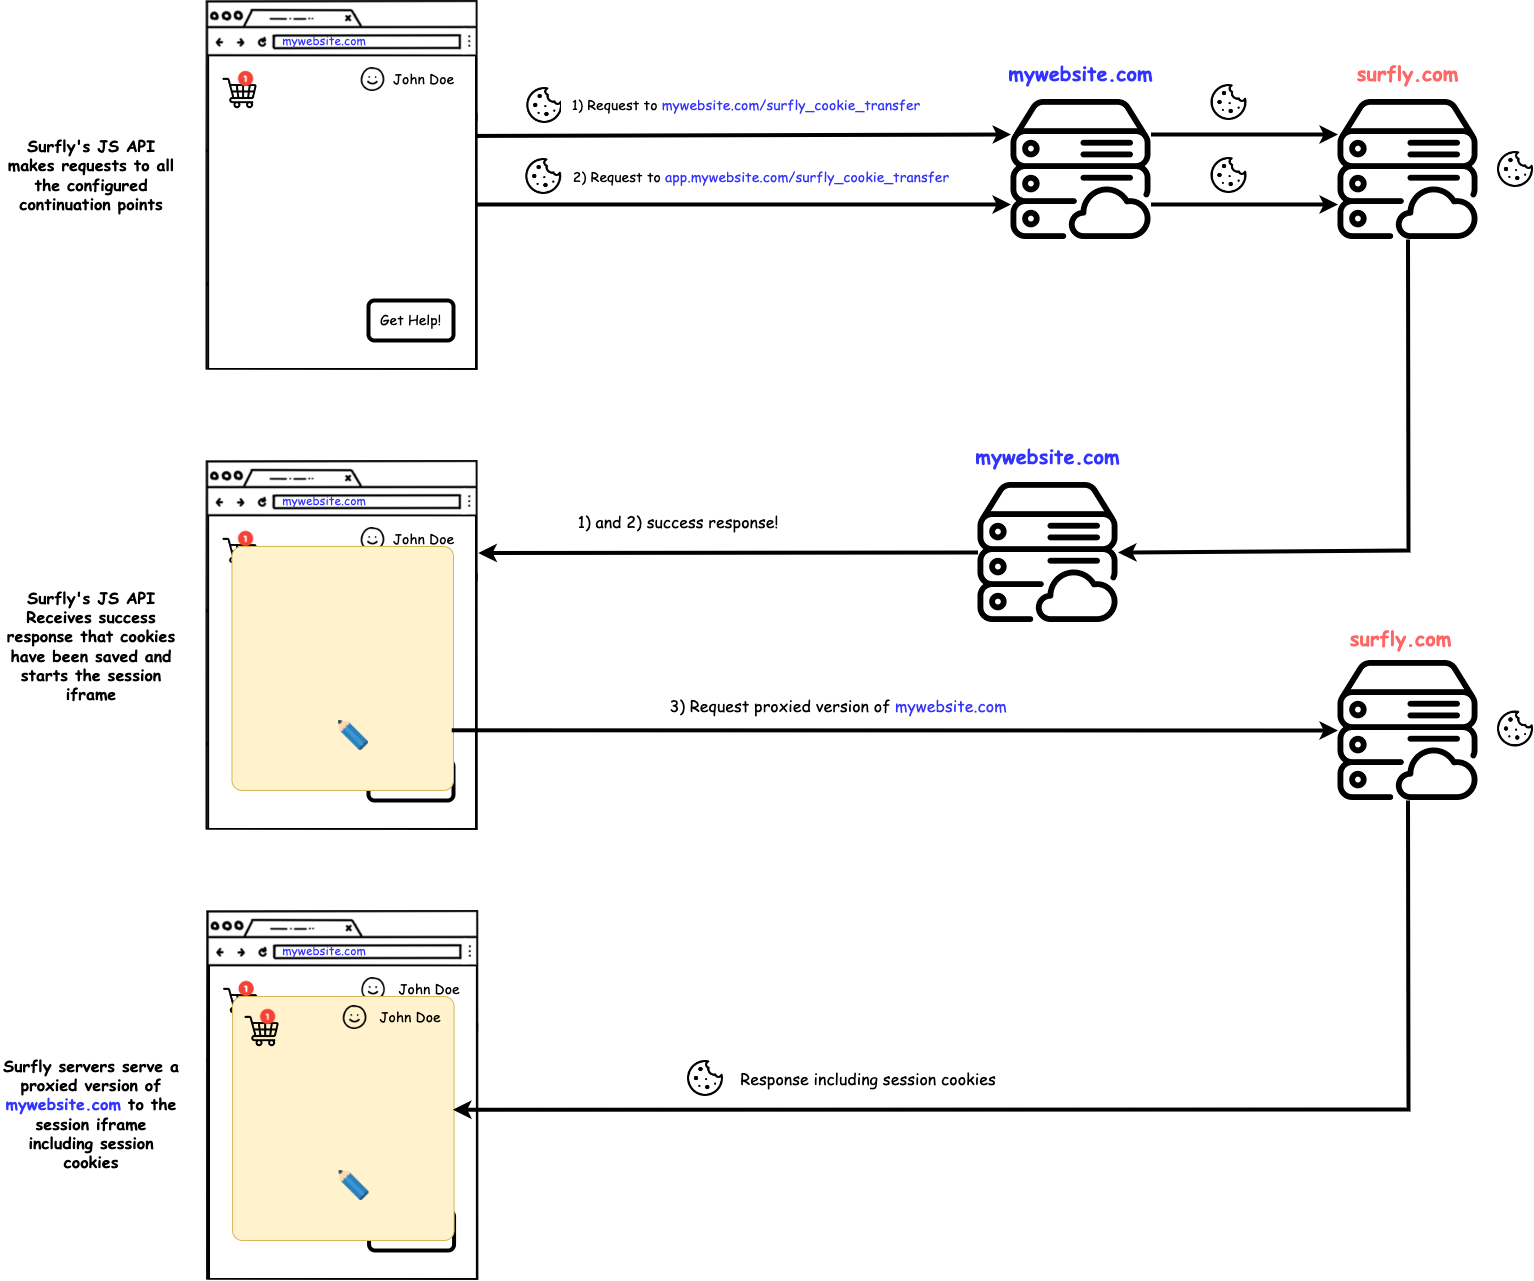
To use session-continuation, you will not only be required to include our JS API in your website but you will also need to implement some endpoints on your servers to which our JS API will make some requests. We call those endpoints "continuation points" and their function is to forward all the requests that they receive to our Surfly servers.
Because such requests will be same-site requests, the browser will attach all apropriate cookies to them and therefor, when these requests are forwarded to Surfly's servers they will be used to start a session keeping the same state.
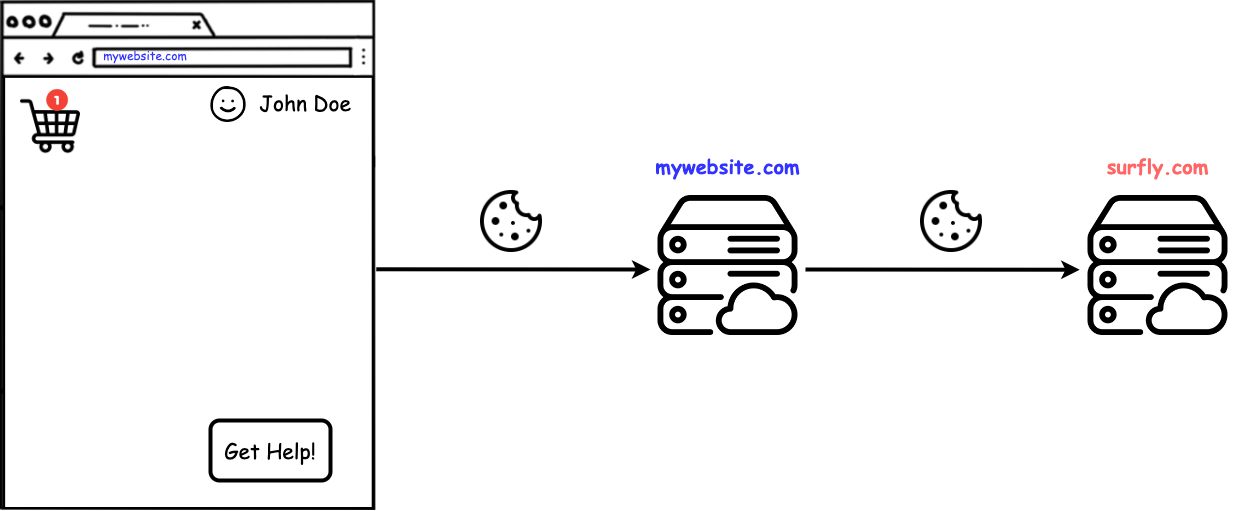
When Surfly's JS API makes a request to your servers the browser will send all
the cookies (including httpOnly cookies) because it's a same-site request.
Then, when these requests are forwarded to Surfly's servers they will contain the necesary cookies so that we are be able to create a Surfly session while preserving the website's state (setting all the cookies in the iframe).
Session Continuation vs. Basic JS Integration
Here you can find a table that summarizes the difference between Session Continuation and a Basic JS Integration:
| Feature | Basic JS Integration | Session Continuation |
|---|---|---|
| Session storage | ||
| Local storage | ||
| Form fields | ||
| Regular cookies | ||
| HttpOnly cookies |
Continuation points
In order to determine which continuation points you need to set up, you first need to figure out which cookies you need to transfer inside the Surfly session.
For example, lets assume when a user is logged in on your website, the cookies
that mantain the state of the login and the shopping cart are called
SESSION and CART respectively.
Then, you have to check what is the domain of those cookies. You should be able ask this information to your development team or you could also check it yourself in the devtools console of your browser.
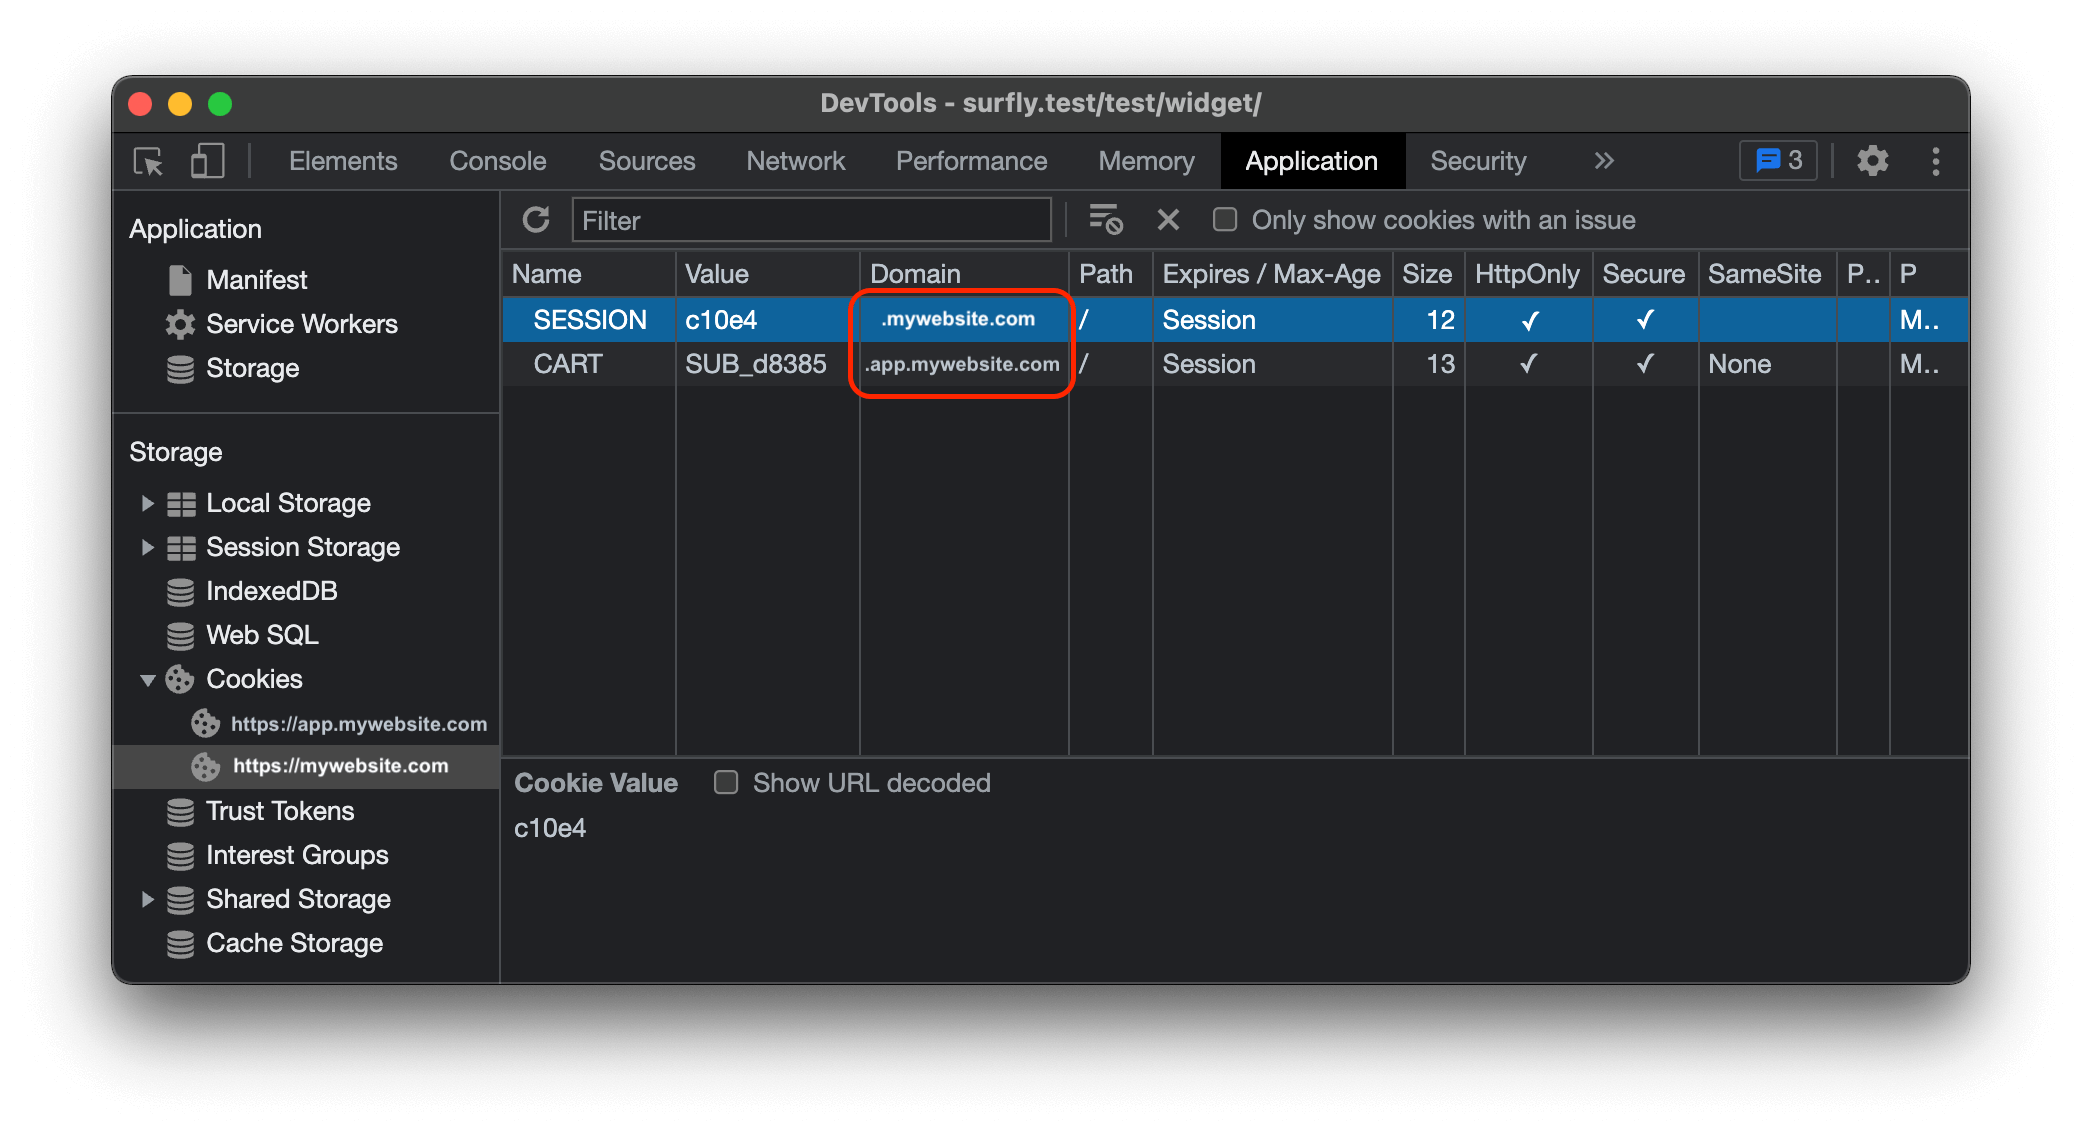
This means you need to transfer cookies from mywebsite.com and
app.mywebsite.com domains into a Surfly session.
Then you would need to set up your infrastructure to forward all requests received on the following urls to our Surfly servers.
mywebsite.com/surfly_cookie_transfer/*app.mywebsite.com/surfly_cookie_transfer/*
The * in this case is not litteral. This means that, for example, the
following requests should all be forwarded to Surfly's servers.
GET https://mywebsite.com/surfly_cookie_transfer/
GET https://mywebsite.com/surfly_cookie_transfer/store
POST https://mywebsite.com/surfly_cookie_transfer/create
GET https://app.mywebsite.com/surfly_cookie_transfer/
GET https://app.mywebsite.com/surfly_cookie_transfer/init
POST https://app.mywebsite.com/surfly_cookie_transfer/restore
How to set this up will vary depending on your particular infrastructure. You might need to configure your servers, CDNs or other parts of your system.
If this is correctly done, then the Surfly JS API will make some requests to these continuation points so that Surfly servers can retrieve the cookies information and set these cookies in the session iframe.
Implementing a continuation point
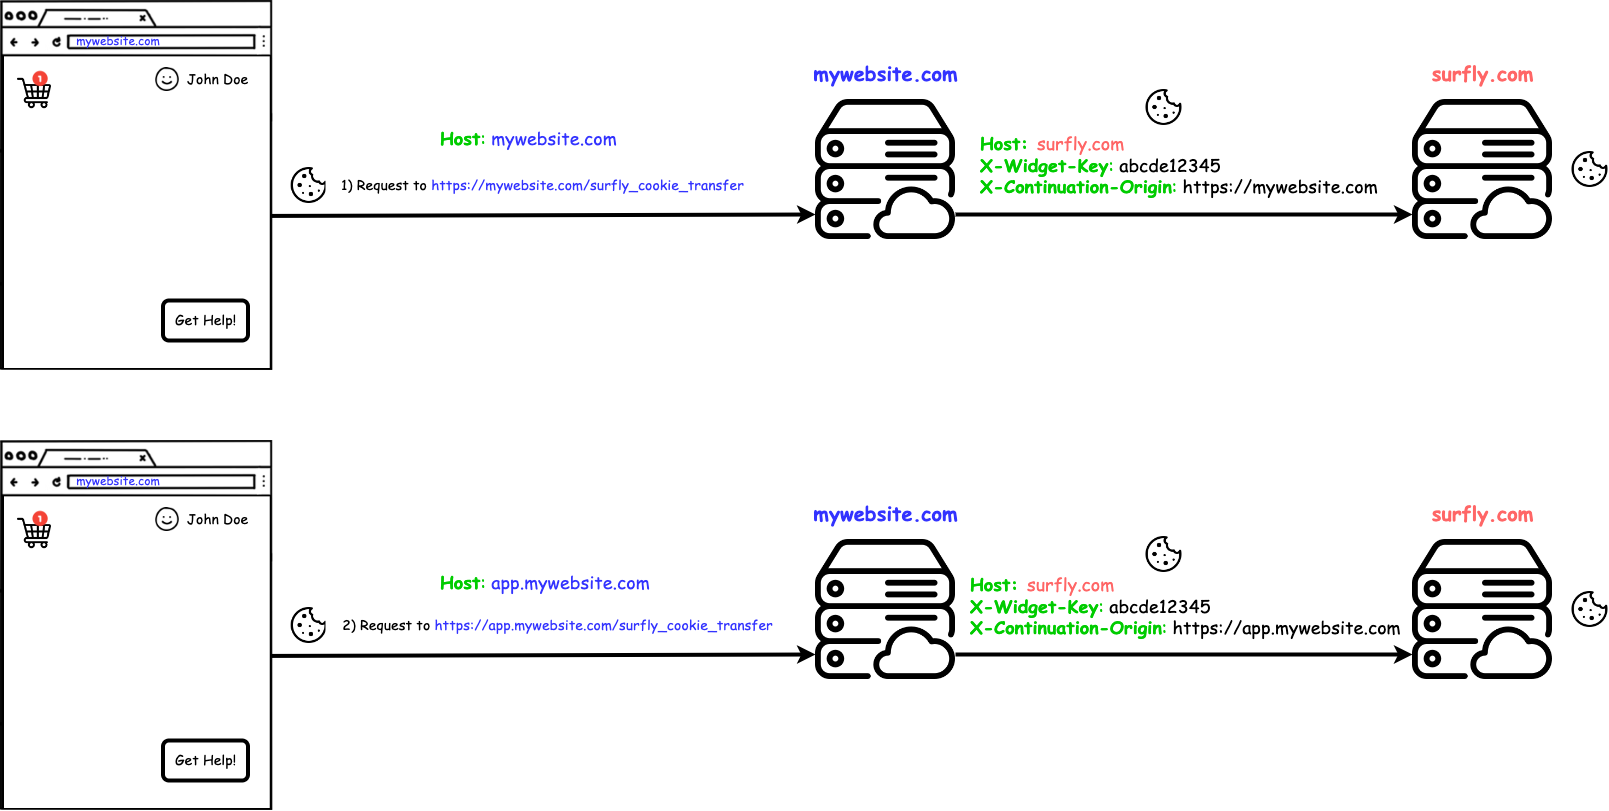
As previously explained, once you figure out what your continuation points are, you'll need to configure your system to forward the requests made to those endpoints to our servers but with some additional headers.
When forwarding the request to our servers you must add the X-Widget-Key and
X-Continuation-Origin headers.
X-Widget-Keymust contain your Surfly widget keyX-Continuation-Originmust contain the origin of your website. That is, a protocol scheme followed by domain name and a port (in case it is non-standard). For example, a continuation point athttps://mywebsite.com/surfly_cookie_transfer/should set theX-Continuation-Originheader to"https://mywebsite.com".
Remember that the protocol scheme matters in this case (”http://example.com"
and "https://example.com" are different origins).
Setting the right Host header
Depending on your infrastruture some systems give you the option to keep or
modify the Host header when forwarding the request (like some popular CDNs).
In these cases keep the Host header with the value of the origin where the
request is going (the surfly servers).
Multiple continuation points
There are a number of reasons why you might need to setup multiple continuation points. Some examples are:
- Your website is served over HTTPS and HTTP
- Your website stores cookies on multiple domains that share a common public
suffix (for example, authentication cookies on
mywebsite.com, but also keep shopping cart cookies oncart.mywebsite.com) - You have implemented Surfly on more than just one domain
All these cases are treated by the browser as different sites so cookies will be isolated in each of them. For that reason you will need to set multiple continuation points and the Surfly script will handle them.
Note that for security reasons, the Surfly widget will ignore continuation urls that don't share a common eTLD+1 suffix with the URL where the session is started on.
Transfering 3rd party cookies
The session-continuation feature is inteded for transferring first party cookies. It is not able to transfer both first and third party cookies.
It is possible, however, to transfer only third party cookies. Check the following advanced guide for more information.
Continuation points in popular servers
You can find example configurations for popular servers below. Note that there might be slight differences, depending on the versions.
- Nginx
- HAProxy
- Apache
- F5
location /surfly_cookie_transfer/ {
    proxy_pass https://surfly.com;
    proxy_redirect off;
    proxy_set_header X-Continuation-Origin https://example.com;
    proxy_set_header X-Widget-Key **Widget key here**;
}
frontend example-com-https
  acl surfly_session_continuation hdr(host) -i example.com path_beg /surfly_cookie_transfer/
  use_backend surfly_continuation_point_https if surfly_session_continuation
  ...your custom configuration here...

backend surfly_continuation_point_https
   https://example.com
   http-request set-header X-Widget-Key **Widget key here**
   http-request set-header Host surfly.com
   server surfly surfly.com:443 ssl
SSLProxyEngine On

<Location "/surfly_cookie_transfer/">
   RequestHeader set X-Continuation-Origin "https://example.com"
   RequestHeader set X-Widget-Key "**Widget key here**"
   ProxyPass "https://surfly.com/surfly_cookie_transfer/"
</Location>
when HTTP_REQUEST
{
    if { [HTTP::uri] contains "surfly_cookie_transfer/" and [HTTP::host] contains "mywebsite.com" }
         {
         HTTP::header insert X-Continuation-Origin "https://mywebsite.com"
         HTTP::header insert X-Widget-Key "<YOUR_WIDGET_KEY>"
         HTTP::header replace Host "surfly.com"
         }
}
Updating your surfly settings
The last thing you need to do is to update the following options in your surfly settings.
- Add all continuation points urls to the
cookie_transfer_urlslist - Set the
cookie_transfer_proxyingoption to true - Set the
cookie_transfer_scopes. Within the cookie transfer scopes, you need to specify all the cookies you want to transfer. So this also includes the non-httpOnly cookies.
You can also update these settings in the Surfly dashboard
Finally, your session continuation settings might look something like this:
{
    "cookie_transfer_enabled": true,
    "cookie_transfer_proxying": true,
    "cookie_transfer_urls": [
        "https://mywebsite.com/surfly_cookie_transfer/",
        "https://app.mywebsite.com/surfly_cookie_transfer/"
    ],
    "cookie_transfer_scopes": [
      {
          "name": "cookie1",
          "domain": ".mywebsite.com",
          "path": "/",
          "httponly": true
      },
      {
          "name": "cookie2",
          "domain": ".app.mywebsite.com",
          "path": "/",
          "httponly": false
      },
      {
          "name": "cookie3",
          // a host-only cookie, note the domain without a leading dot
          "domain":"mywebsite.com",
          "path": "/",
          "httponly": false
      }
    ]
}
Cookies with Path
In the example that we have been using, both the SESSION and CART cookies
are set on the root path /.
If the cookies that you need to transfer live on a more specific path you will
need to include these paths in the urls that you set in the
cookie_transfer_urls field of your surfly settings.
For example, if the scenario was the following, we can see that the CART
cookie lives in the /test/widget path.
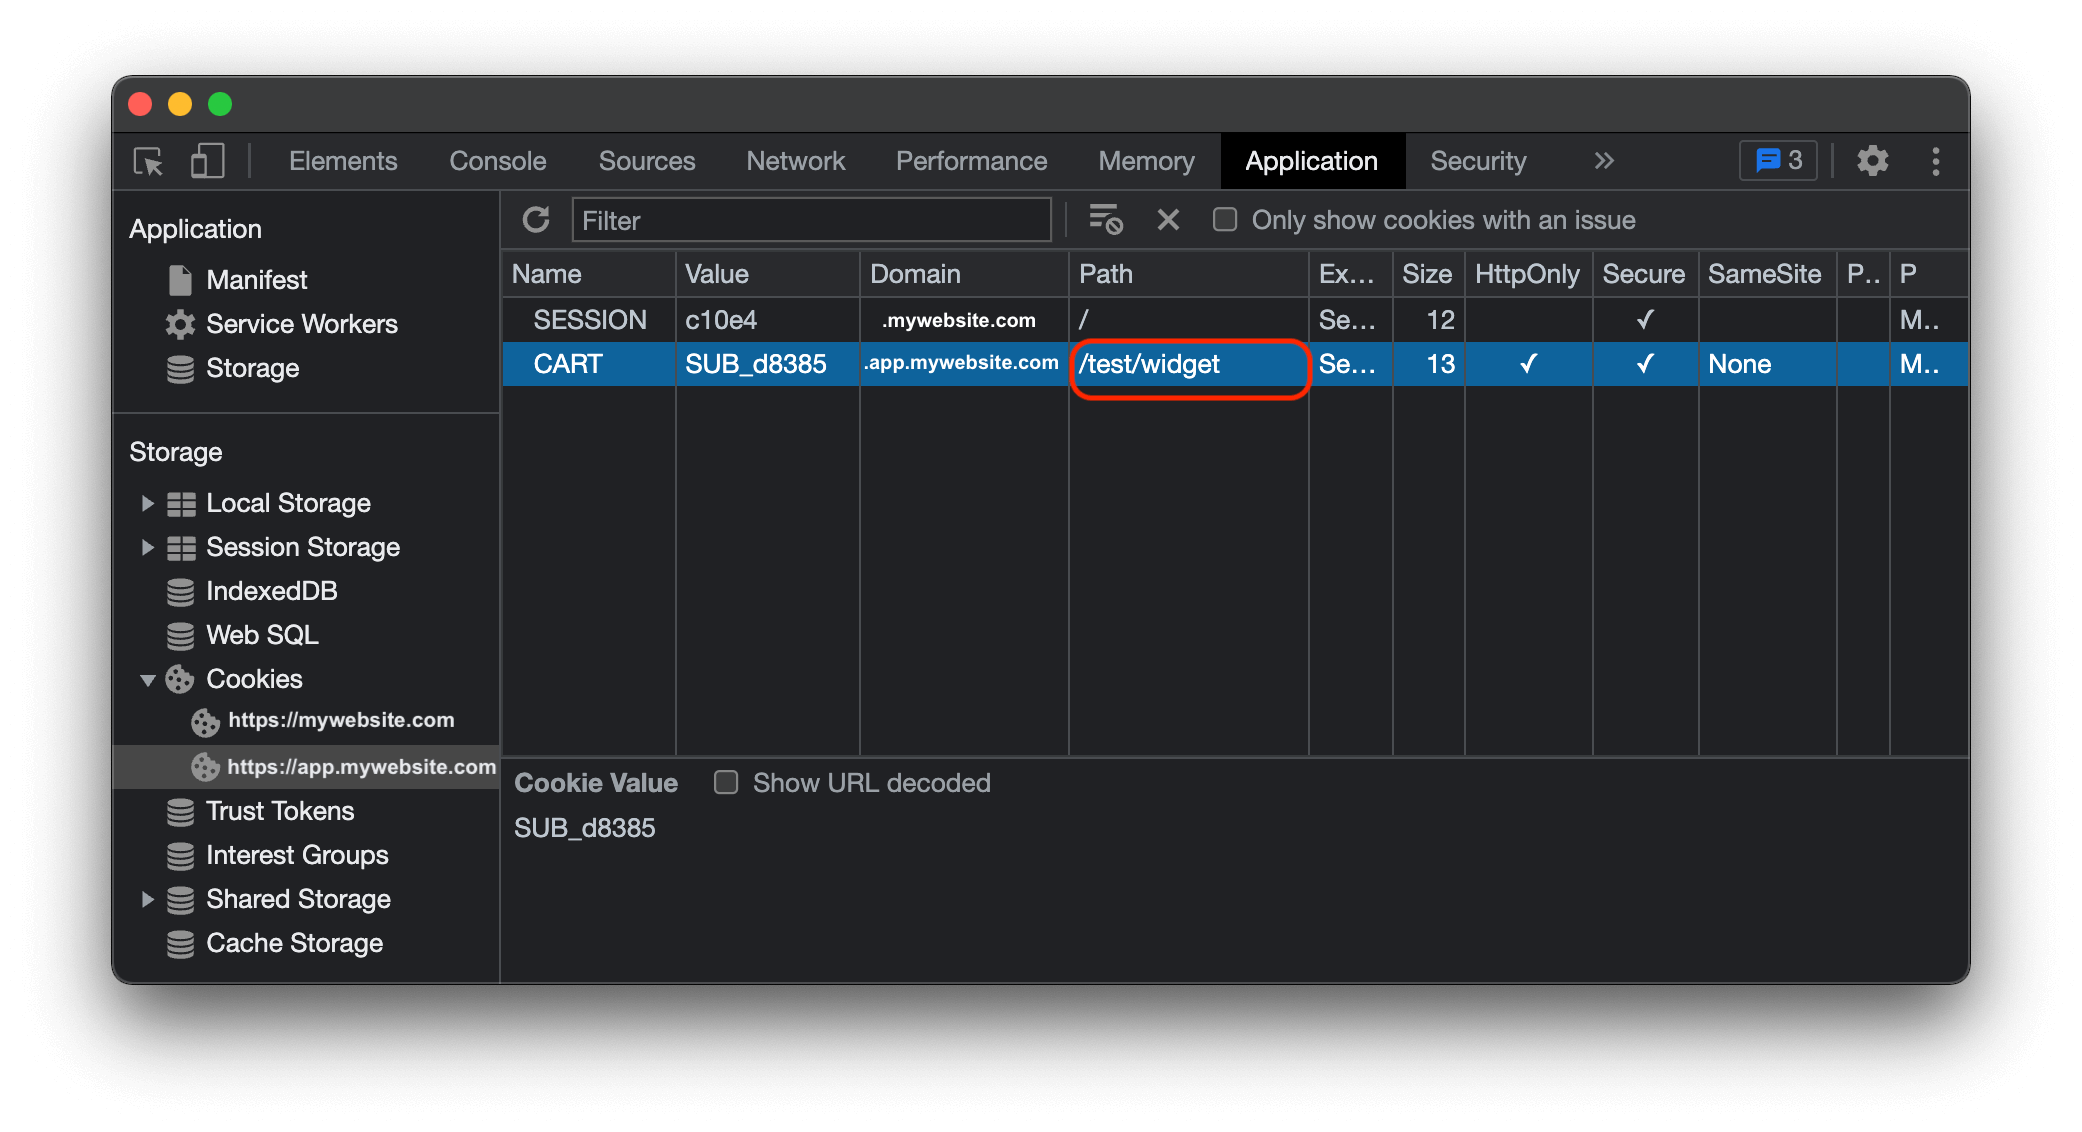
In this case, you will need to include this path in one of the urls that you set
in the cookie_transfer_urls field.
The right url to include this path is the one that has the same domain as the
one where the cookie lives.
This path should be appended right after the url domain and before the
/surfly_cookie_transfer/ path section.
{
    "cookie_transfer_urls": [
        "https://mywebsite.com/surfly_cookie_transfer/",
        "https://app.mywebsite.com/test/widget/surfly_cookie_transfer/" // url with custom path
    ],
    "cookie_transfer_scopes": [
      {
          "name": "CART",
          "domain": ".app.mywebsite.com",
          "path": "/test/widget",    // updated cookie scopes
          "httponly": false
      }
    ]
}
Verifying the set up
As a debugging and diagnostics tool, you can navigate your browser to a specific
url in which we will reply with a verfication test page. This url is composed of
your domain and the specific path /surfly_cookie_transfer/
For the example that we have been using in this guide, the url of the test page
would be https://mywebsite.com/surfly_cookie_transfer/
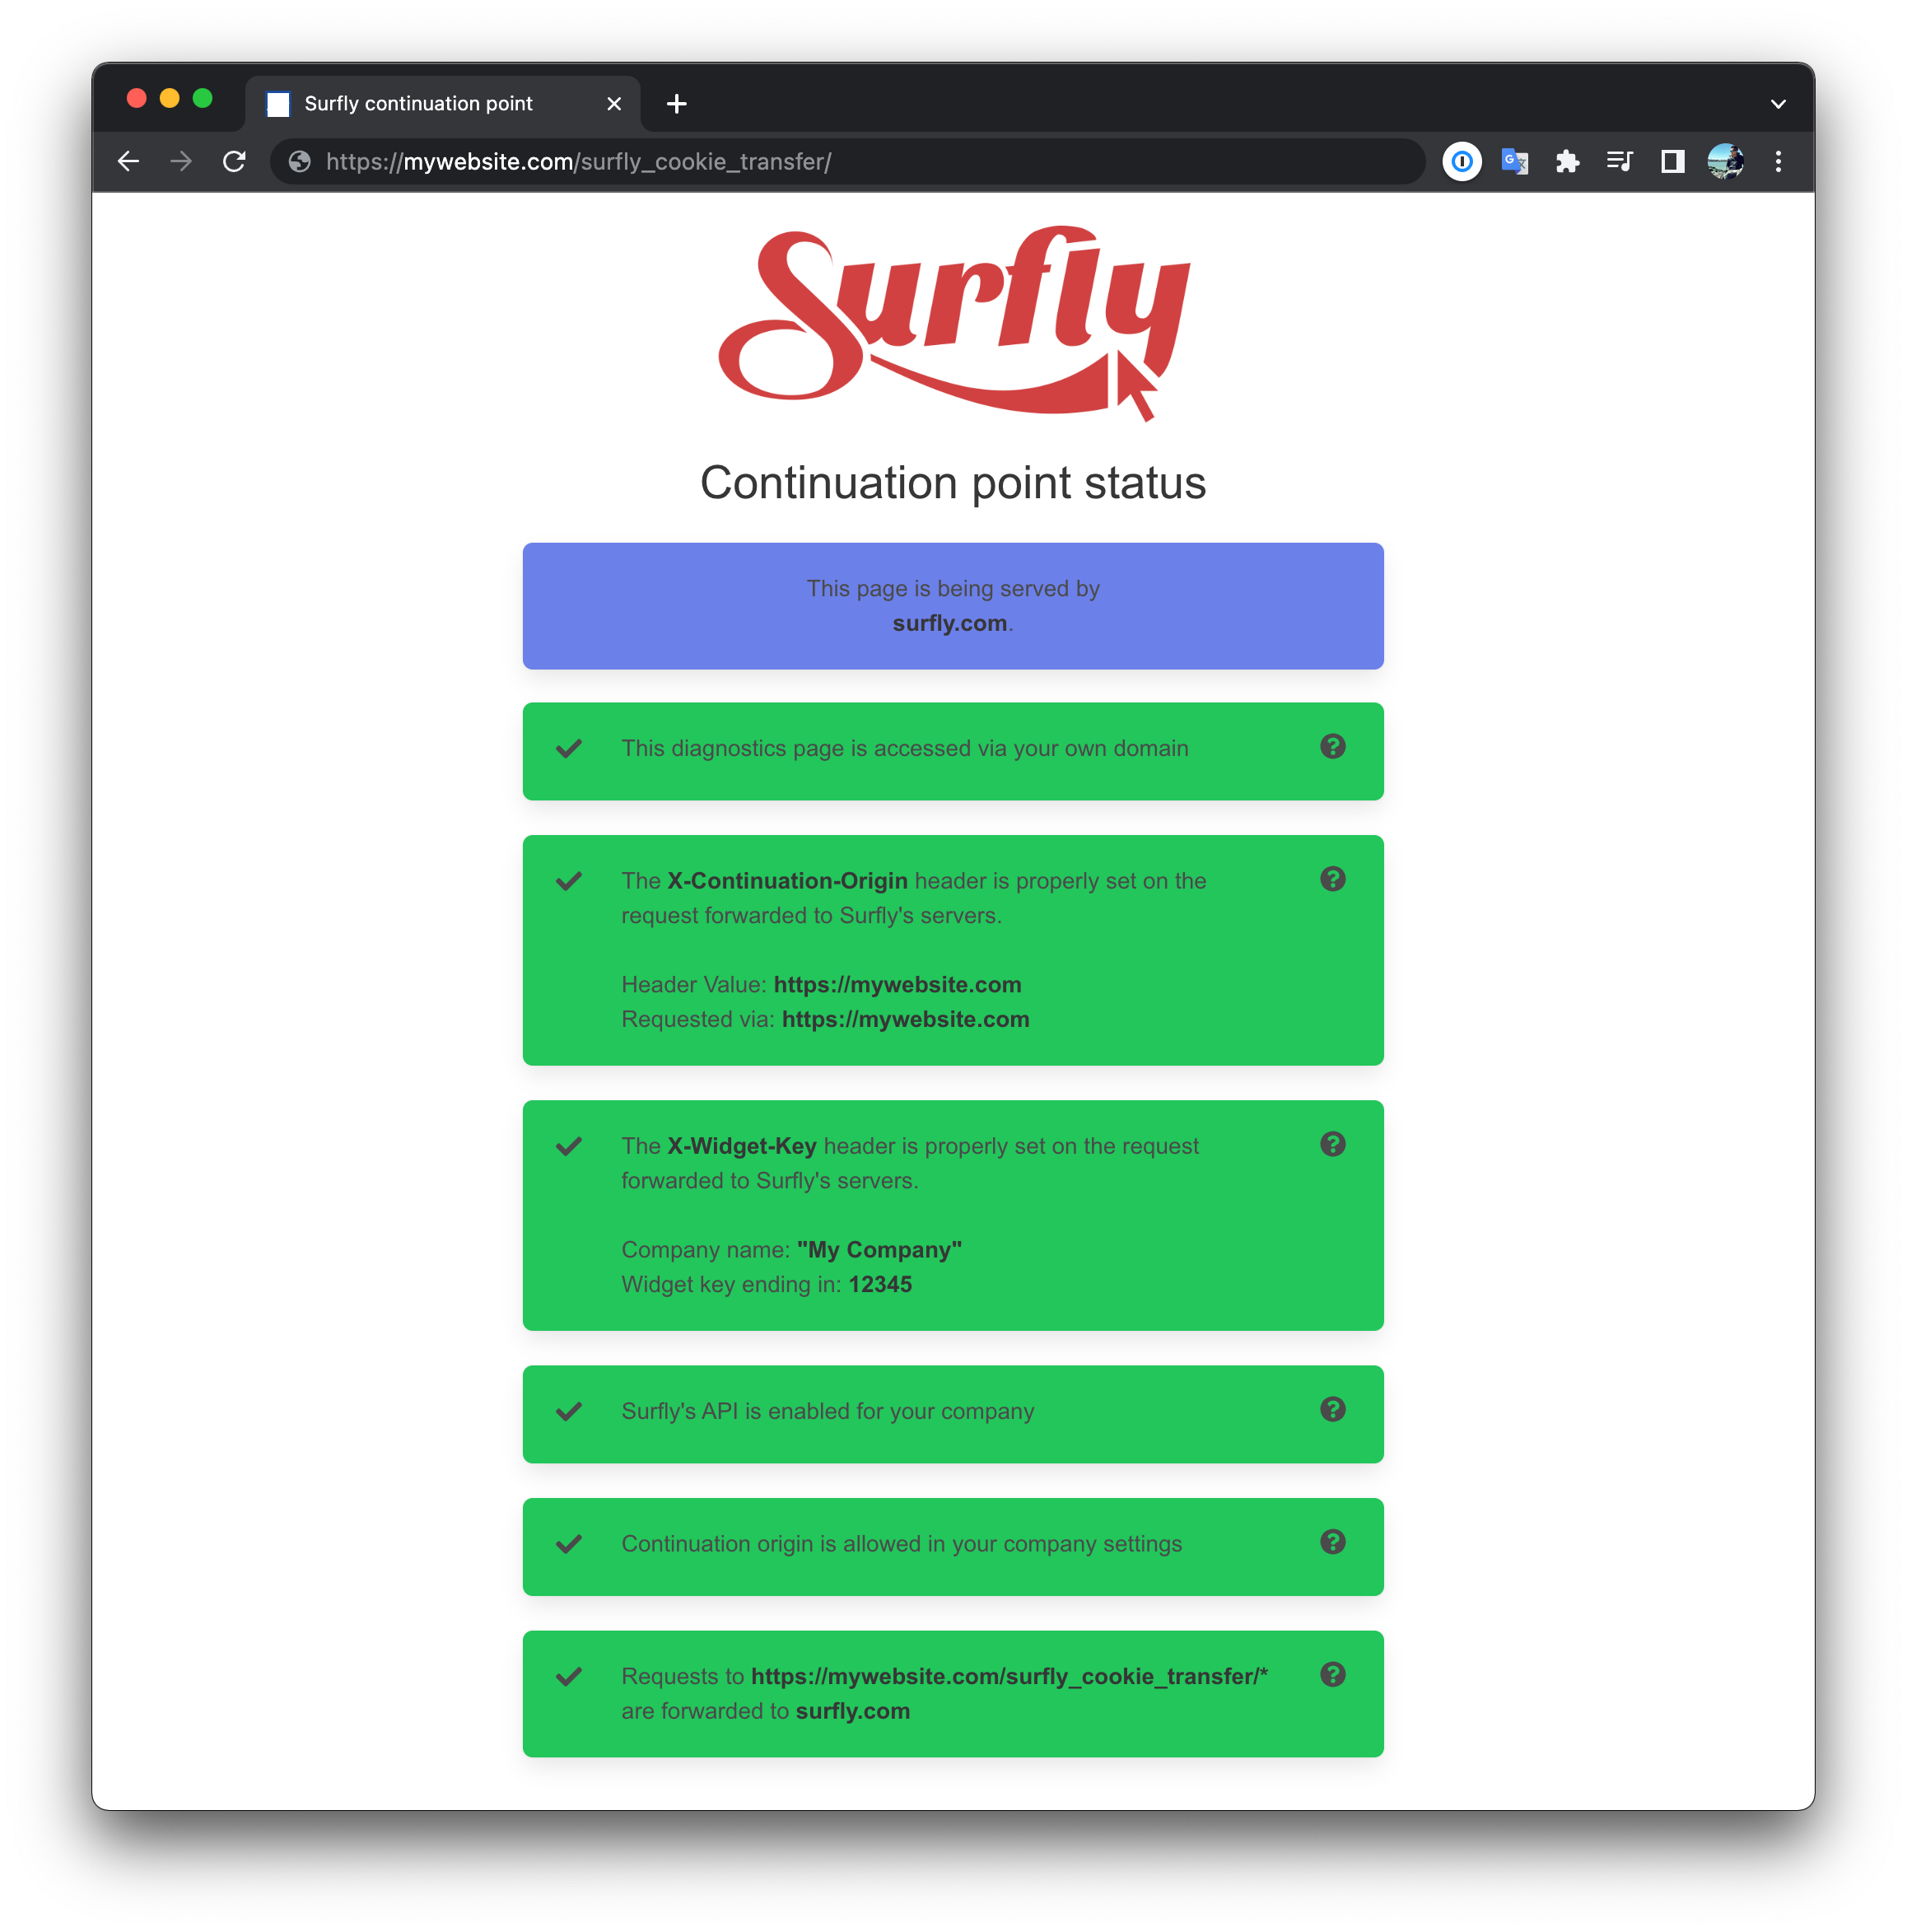
When you navigate your browser to that url, the request should be forwarded to Surfly's servers and if your setup is not right, you might see a website that looks like this:
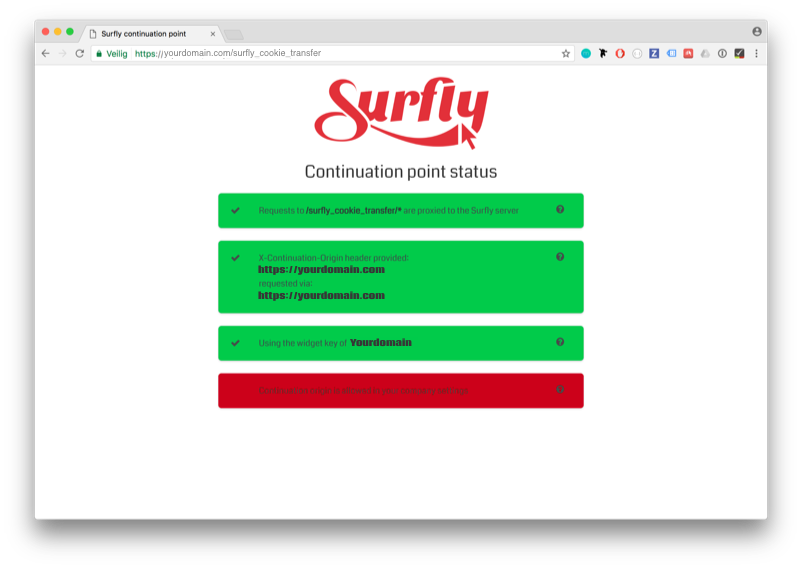
This means there some thing to fix in the setup. After fixing all the issues you should refresh this webpage to verify again. When everything is correctly set up the website should look like this:
If any other boxes are red they will show a description of the problem detected. This means that your continuation point is not set up correctly.
Click the question mark icon (“?”) of the respective box for more detailed instructions on how to adjust this.
Transfer session cookies back
Up to this point we have seen everything that's needed so that Surfly sessions can start on your website mainting the session cookies. In a typical scenario, when the Surfly session ends, the user keeps browsing your website normally. If session cookies did not change, there's nothing left to do.
But in some scenarios, httpOnly cookies might update their values during the
Surfly session lifetime.
For those cases, you might want the user to continue browsing your website with those new values to maintain the state of you website.
This is possible and is called cookie-backtransfer.
Enabling backtransfer
If you want to enable cookie-backtransfer you will have to run Surfly from your own domain. This is technicality needed to avoid cross-site requests limitations.
Contact our support team to enable running Surfly from your own domain.
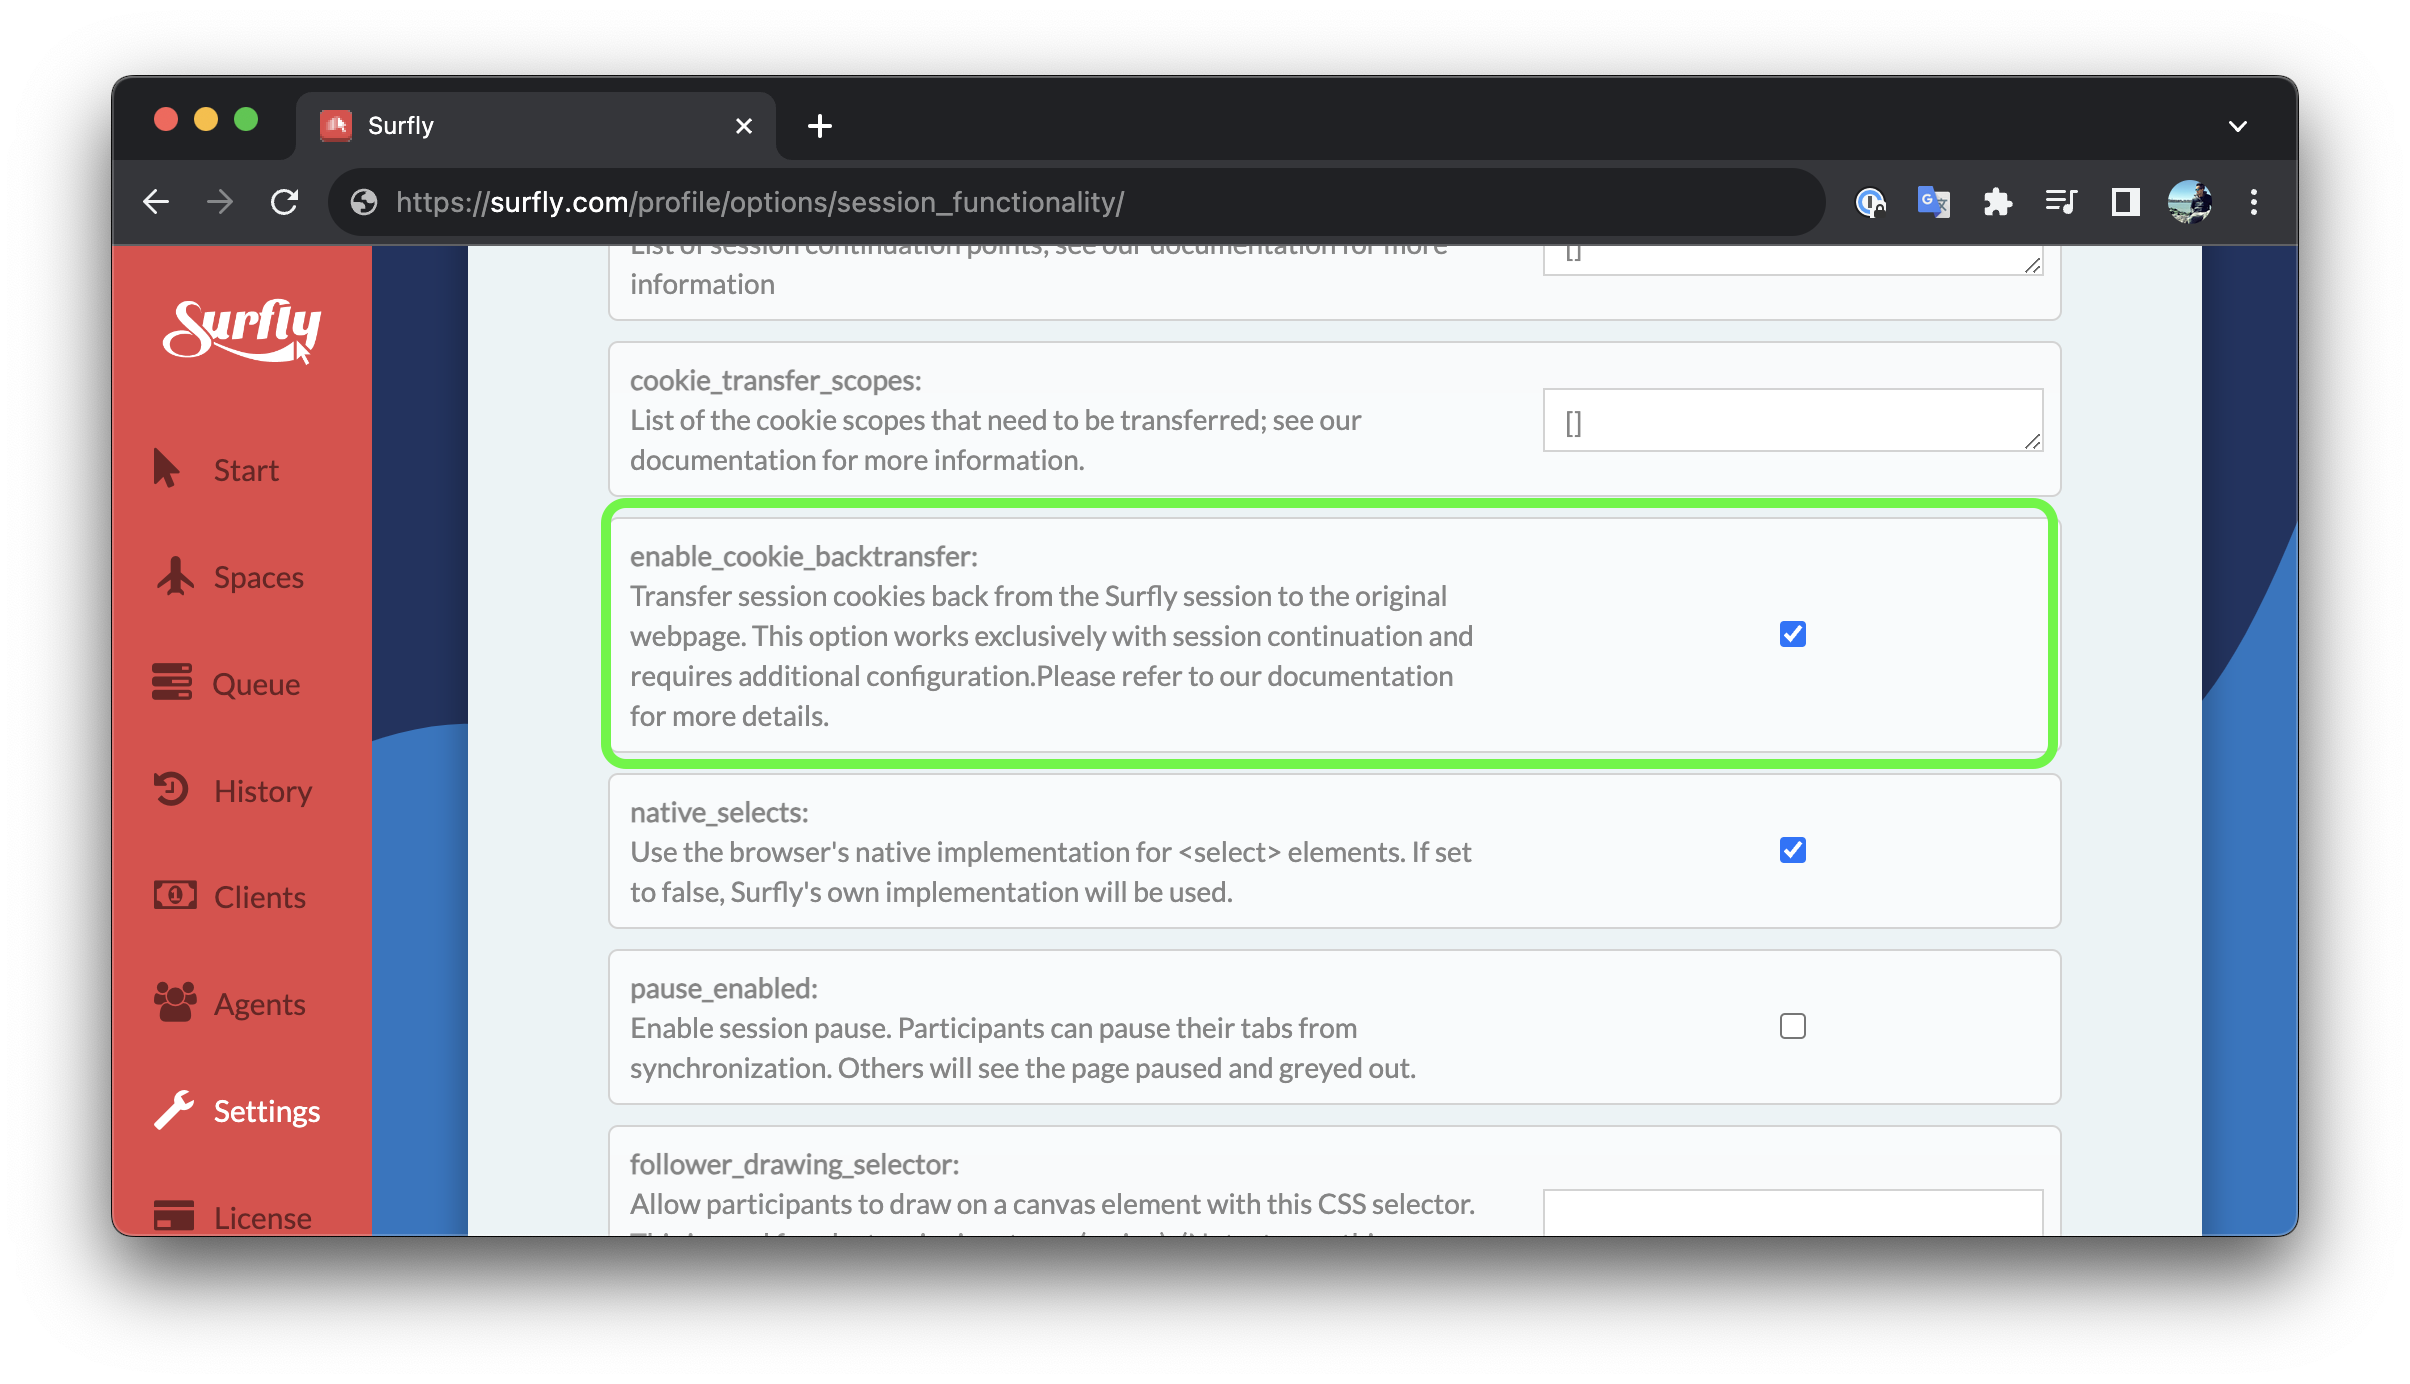
Once that's done, you only need to check the enable_cookie_backtransfer flag
in your Surfly settings
